Friday, October 28, 2011

A Yellow Apron 10!

Beef Skewers with Soynut Butter Sauce

I made this dish awhile ago, but am finally getting a chance to post about it!  The official Yellow Apron Taste Tester (C., the boyfriend) gave this dish a 10.  It was delicious, and super easy.  As you have probably realized by the types of dishes I typically write about, I'm not much a meat eater/cooker.  I always get nervous with cooking meat: is it not done? is it done too much?  But this dish, was a meat dish even I could handle!  I paired it with the Citrusy Sweet Potatoes too and what a combo it was!

PS: I had originally got the idea for this recipe from an Everyday Foods magazine.


Ingredients: (for 2 people)

1 pound of flank steak
Olive oil
Garlic salt
2 tablespoons lime juice (fresh if possible)
1/3 cup chunky soynut butter (PB is fine too, I just love soynut butter)
2 tablespoons light brown sugar
1 tablespoon soy sauce


Steps:


1) Brush the steak with olive oil and rub with garlic salt.  (Chef's choice as to how much).  Then cut steak thinly across the grain.

2)  Heat broiler to high and place the rack on the top level.

3) Thread the steak pieces onto skewers and place on a cookie sheet lined with aluminum foil.  Metal skewers are better to use as they won't burn like wooden ones can.  Set to the side while you make the sauce.

4)  Sauce: In a small bowl mix together the soynut butter, sugar, soy sauce and lime juice.  The original recipe called for 1/4 cup of water, but I'm pretty sure I forgot it when I was making this.  My sauce was just very thick...but still yummy!

5)  Place the skewers under the broil.  I cooked the beef for about 3-4 minutes, flipped the skewers and continued cooking for about 2-3 minutes.

6)  Serve skewers with sauce on the side and Citrusy Sweet Potatoes!


Beef Skewers with Soynut Butter Sauce

Citrusy Sweet Potatoes


~Eat Well and Be Happy~
  

Monday, October 10, 2011

Citrusy Sweet Potatoes

Ok so work is really starting to get in the way of my blogging... Good thing today is Columbus day, and I can finally get caught up.

I made this side dish a few weeks ago as part of a bigger meal.  Timing with my cooking is something I really have to work on.  I thought this meal was going to be quick and easy... easy yes, but quick, not so much!  The sweet potatoes ended up taking much longer than I thought, which threw off my timing for everything else.  (Check back soon for the beef skewers that were also part of the meal!)

The Citrusy Sweet Potatoes are the perfect dish if you have the feeling where you love fall, but are still slightly holding on to summer.  Weird way to describe a dish right??  However, the sweet potatoes make it a great fall side dish, while the pomegranate and lime make it feel more like a summer dish.  Hence the summer leading to fall dish! I originally got the idea for this dish from the Whole Living Blog.  (Seriously, if you don't subscribe to it, it is a MUST!)


Ingredients: (for 2 people)
2 sweet potatoes
1/4 cup of unsweetened coconut flakes 
2 tablespoons cilantro
1 pomegranate
1 lime

Sidenote:  The originally recipe called for toasted unsweetened coconut flakes.  I didn't find the unsweetened coconut flakes until after I made these (Whole Foods bulk section), so I went with just what's in the baking section of my regular grocery store.  I also didn't toast them because of my timing issue.  I will be trying that with dinner tonight though!  The original recipe also used coconut milk, but I am not a fan of it!


Steps:
1)  Heat oven to 400 degrees.  Prick the sweet potatoes with a fork so steam can escape.

2)  Bake on a cookie sheet for about 45 minutes.  (I ended up having to put mine in the microwave for an additional 10 minutes).


3)  While the sweet potatoes are cooking, cut open the pomegranate.  I read somewhere the best way to do this is under water.  I cut the pomegranate in half horizontally, then soaked each half upside-down in water.  After about 5 minutes, it's much easier to break apart the pomegranate (in the water!).  The seeds start to separate from the rind.

4) When the sweet potatoes are done, and have cooled enough so you can touch them, cut them in half.   Slightly mash each side.  If you can't easily do this, then they probably need to cook longer.


5)  Sprinkle the top of each potato with the pomegranate seeds, coconut flakes, cilantro (chopped).  It's really tasters choice with how much you add of each.  Then squeeze the lime juice on top of each potato, about half a lime per potato!


~Eat Well and Be Happy~

Tuesday, September 27, 2011

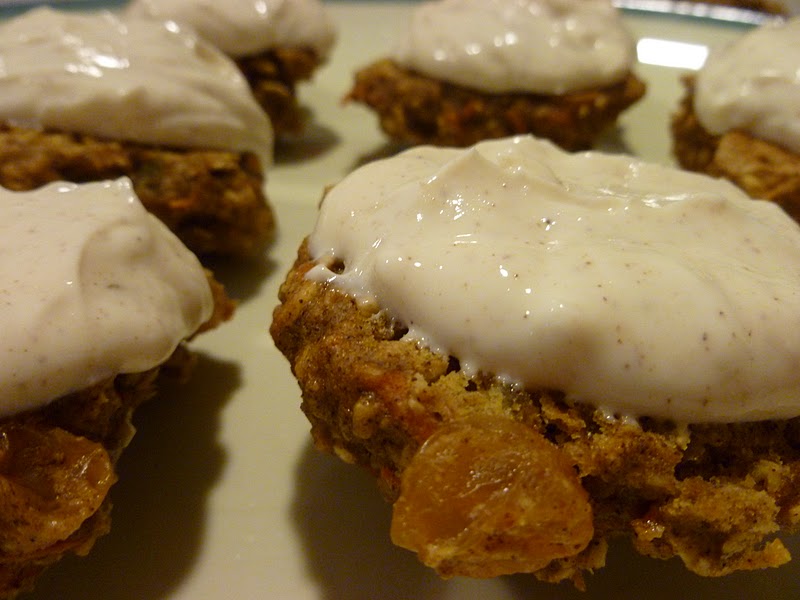
Carrot Cake Cookie Sandwiches... a real mouth full!

Think... carrot cake meets ice cream sandwich meets healthy treat and you have a Carrot Cake Cookie Sandwich.  I found this recipe through the WebMD recipe blog.  If you don't already subscribe to it, you must ASAP. The blog shows the best healthy recipes (well besides Yellow Apron Experiment ones of course).  I'm not usually much of a baker, but I thought these deserved a try.  I never bake because then the sugary high calorie treats are in the house, and well we just end up eating them in no time at all!


I re-wrote the recipe as I found it, with my added in additions...

Ingredients:
1 cup organic whole wheat pastry flour (very different from regular whole wheat flour)
1/2 cup wheat bran (I couldn't find this, so I used oat bran)
1 cup oatmeal (such as Quaker Old Fashioned Oats)
1/2 tsp. baking soda
1/2 tsp. baking powder
1 tsp. salt
1 tbsp. cinnamon
1 tsp. pumpkin pie spice

1 tbsp. vanilla extract
1 1/2 cups shredded carrots (yes, hand shredded not store bought)
2 eggs
1/2 cup unsweetened applesauce
2 tbsp butter, room temperature (if not softer!)
1/2 cup brown sugar
1/2 cup golden raisins


Filling:

17.6 oz container 2% plain greek yogurt

1/4 cup honey
1 tbsp. cinnamon
(I also added some coconut flakes)


Steps:
1)  Preheat oven to 325 degrees

2)  In a small bowl, soak the raisins in 1/2 cup hot water.  (I really have no idea why you have to do this...)


3)  Grate the carrots by hand.  At first I thought why in the world would I do this, when I can just buy shredded carrots.  But then I realized, store bought ones are rather long and stringy.  For this you really do need the carrots hand grated, so they are much smaller pieces and much softer.

4) In a bowl combine the eggs, applesauce, butter, brown sugar, and vanilla.  Mix well.

5)  Drain the raisins, and add to the wet mixture.  Mix in the carrots.


6) In a large bowl, combine the dry ingredients: flour, oat bran, oatmeal, baking soda, baking powder, salt, cinnamon, and pumpkin pie spice.


7)  Slowly add the wet ingredients to the dry ingredients.  Mix throughout.  The dough will be stickier than your normal cookie, but thick enough to form on a cookie sheet.

8)  Line a baking sheet with parchment paper (wax paper).

9)  Drop a small amount of dough onto the sheet.  I used a tablespoon, but you could even go smaller.

10)  Bake for about 12-16 minutes.


11)  In the meantime, mix the ingredients for the filling.  Let sit in the fridge until all the cookies are done and have cooled.

12)  Assemble the cookies:  I tried it first with two cookies, and filling in the middle.  This was almost too much.  I liked it better with just one cookie and a dollop of filling on top.


Warm cookies with the filling on top


Eek!!

13)  If you aren't going to eat the "sandwiches" immediately, plan on laying the cookies on a platter and freezing them.  The downfall to this, is the cookies do take up a lot of space.  I had to completely re-arrange our nicely organized and categorized freezer (yes, I am a bit anal with organization... but you have to be when working with middle school kids!).   If you do freeze the cookies, zap them in the microwave for about 15-20 seconds before eating them.


Frozen cookies...


(I read that one sandwich (2 cookies, and filling) is only about 146 calories... but I don't know how accurate that really is!!


Ever try this recipe or any of the other Yellow Apron Experiment recipes??? I'd love to hear all about it in the comments below!

~Eat Well and Be Happy~  


Sunday, September 25, 2011

Stuffed Avocados

I seriously think I could live off avocados.  I probably eat them at least 4-5 times a week, and always love it when I find new avocado recipes.  I had originally found the idea for this from a fellow food blogger (Thanks Kitchen Trial and Error!), but changed it to suit my needs.   

I served the stuffed avocados as a side dish, using just 1 avocado for 2 people.  These would also be great to serve if you have people over for dinner.  They take about 2 minutes to make, but look and taste great!


Ingredients:
avocados (at least 1 per 2 people people)
1 can black beans
salsa 
feta crumblers
fresh mint leaves (chopped)


Steps:

1.  Cut the avocados in half the long way.

2.  Use a knife to remove the pit.

3.  Using a small spoon, scoop just a little bit of the avocado out to make the indent bigger.  This way there is more room to fit the filling!

4.  Warm the beans in a microwave safe dish for about 45 seconds.  Then place 2-3 tablespoons of the beans in the avocado "indent."

5.  Top with some salsa.  I have absolutely no spice tolerance so I opted for Newman's Own Mild Tequila Lime.  

6.  Sprinkle with feta crumblers and chopped mint leaves!


~Eat Well and Be Happy~


Tuesday, September 20, 2011

Vegetarian Lettuce Wraps

This was a new recipe that I tried last night, and while it was a rather messy meal, it was a huge success!  I had originally gotten the idea for the lettuce wraps from an old issue of Everyday Foods (great mag!!).  It can easily be made with a ground meat if you choose...I went the vegetarian route though.  I'd only make a few modification to the way I actually put the wraps together (see bottom for these).


Ingredients:


1/4 c. soy sauce
3 tsp. sugar
1 tsp. rice vinegar

olive oil (for pan)
1 large shallot
2 garlic cloves (chopped)
2 tbsp. ginger (chopped)
1 package MorningStar Meal Crumblers
shredded carrots
sliced mushrooms (broken into smaller pieces)
1 head iceberg lettuce

From L to R: Garlic, Shallots, Ginger

Steps:

1.  In a small bowl, mix the soy sauce, sugar, and rice vinegar.  Set to the side.

2.  In a large pan, pour a small amount of olive oil on the bottom.  Move the pan around, so the bottom is covered.  Add in the shallots, garlic, and ginger.


Sidenote:  After peeling my garlic, I realized I have had it for WAY too long, and the garlic was not good anymore (It was now soft).  Thankfully I always have a supply of the pre-minced kind in the fridge!


3.  Add in the mushrooms and carrots.

4.  Add in the veggie crumblers.  Cook until hot.

5.  At the very end, add about half the bowl of the sauce to the pan.

6.  Serve in lettuce leaves, with the remaining sauce on the side.


Modifications:
1)  I'd use much less filling than I originally did.
2)  I would also use 2 lettuce pieces for one wrap.


~Eat Well and Be Happy~

Tuesday, September 13, 2011

Apples, Onions, and Pork

On a beautiful fall afternoon, C. (the boyfriend) and I thought it was very appropriate to go apple-picking.  I mean what could be better on a fall day than being outside, walking through orchards, picking apples, and having apple cider donuts!  We did our research and found one in Natick, called Belkin Family Lookout Farm.  Perfect I thought, what a great spot to spend the day.  Over $50 later... we felt like our apple picking experience was the biggest scam ever!!


While it was still a beautiful place, and we had a great day, it was $14 PER PERSON just to enter, and then $2.50 a pound for your fruit.  We got about 25-30 pieces of fruit, and paid $25 for just the fruit! I think what made me so upset was there wasn't even any apple cider donuts!! Those are like my once a year treat that I always look so forward too.


So with the apples we did pick, I made a delicious dinner.  Plus, as a fun evening activity we made an apple pie together! Yes, I actually shared the kitchen and we made it together.


Ingredients:

Glaze:
1/4 cup balsamic vinegar
2 tablespoons maple syrup

1-2 apples, sliced
1/2 onion, sliced
pork (fat trimmed)
sea salt
minced garlic
olive oil


Steps:

1) Pre-heat oven to 400 degrees.

2) Make the glaze... add the syrup and balsamic to a small sauce pan and bring to a boil.  Continue to stir for about 3-4 minutes.  Remove the pan from heat and set to the side.

3)  Drizzle a small amount of oil on the bottom of a baking dish.  Add in chopped apples and onion.

4)  Rub the pork with some sea salt and minced garlic (chef's choice on amount).


5)  Place the pork on top of the apples/onions and drizzle the glaze on top.  Be sure to flip the pork so the glaze gets on both sides.

6)  Bake until the meat thermometer reads about 150 degrees (about 10 minutes).

7)  Remove the dish and let sit for about 5 minutes.


What's your favorite apple picking place??? Have a better experience that we did???

~Eat Well and Be Happy~

Wednesday, September 7, 2011

Back-to-School and Butterfly Chicken

Well we've been back to school a full week now, and I have yet to get used to standing and talking all day. Those of you who are not teachers, let me enlighten you to the oh-so-lovely beginning of the year questions...
Hoops and Yoyo reminder!

Student: "Where do I put my warm-up paper?"
Teacher: "How about in the warm-up section of your binder."

Student: "What does confirm password mean on my account?"
Teacher: "Confirm your password by retyping it"

Student: "What does password hint mean?"
Teacher: "A hint to remember your password."

Student: "I put my lock on backwards, can you unlock it?"
Teacher: "Sure, let me be a contortionist to unlock that."

Student (said on day 3): "Where is the main exit of the school to leave?"

Student: "When is lunch time?"


But in reality, I (and all you other teachers out there!) find the humor in questions like these, and love striving to turn on that "little light bulb" in students' heads!

And now, for the dinner...  I had gotten this idea originally from the Whole Living blog.  I called it Butterfly Chicken, because of the way you cut the chicken.

Surprisingly, I actually usually HATE chicken.  I find it's always dry, no matter how moist it may actually be (traumatic childhood chicken experience).  Even though my taste-tester (my boyfriend) said it wasn't dry in the least. He said (as unbiased as he can be) it was one of his favorite dishes, a 9 out of 10.  I on the other hand gave it probably a 6/7, mainly because of my issues with chicken.    


Ingredients: 

Marinade:
Italian dressing made with oil, vinegar, and seasoning

Boneless, skinless chicken breasts
Garlic sea salt
9 (or so) fresh basil leaves
2 beefsteak tomato


Steps:


1)  Butterfly the chicken breasts.  Do this by horizontally cutting through the chicken, but don't cut all the way.  This way you can open the chicken breast like a butterfly!


2) Place the chicken in a small dish, and cover with the italian dressing marinade.  Be sure each part of the chicken is fully covered.


3)  I let it sit for about 2 hours. You can certainly experiment with a longer or shorter time.  However, I wouldn't do less than 30 minutes.


4) Line a cookie sheet with tin foil.


5)  Open the chicken and layer with sliced tomatoes, basil, and garlic salt.  Close the chicken.


6)  Broil on high for about 7 minutes a side.  I always use a meat thermometer to test the thickest part.


Anyone have back-to-school stories?? Silly things you did as a kid??  What helps get you through those long days?

~Eat Well and Be Happy~