Tuesday, August 30, 2011

Mexican Bean Soup

Well school has officially started, and can you actually believe it, I am writing this BEFORE school!  Don't get too used to that, as it probably won't ever happen again.

This Mexican Bean Soup is full of flavor and the best part of it is, it's customizable.  I had originally found the recipe from Whole Living (great magazine/blog!), but theirs didn't have much substance to it.  So I rummaged through the cupboard to find beans, beans, and more beans.

Now, I have no spice tolerance at all.  It's something I have been working on for many years, but I haven't really gotten far at all.  Just to build you a picture... the extremely mild salsa at Margarita's is WAY too spicy for me.  So, because of this little issue I am working on, I eliminated all the spicy parts.  I had bought a jalapeno to put in my boyfriend's soup, because he LOVES spicy foods... but of course I forgot it in the fridge.


Must have ingredients:
6 garlic cloves
2 tablespoons lime juice
6-10 fresh basil leaves
1 small white onion
1 teaspoon ground cumin
1 28 oz. can whole peeled tomatoes (drained and crushed)
3 ears of corn
4 cups low sodium chicken stock
1 avocado
olive oil


Optional Side Ingredients I added:
1 can black beans
1 can black eyed peas
1 can kidney beans
1 can mushrooms
1 can cannelloni beans  


Other good add-in's
rice
chicken
fresh cilantro (grocery store was out)
spicy things
tortilla chips?


Steps:

1) In a food processor, combine 5 of the garlic cloves, lime juice, and basil.  Set to the side.


2) Lightly coat the bottom of a large pot with olive oil and add in chopped onion and 1 chopped garlic clove.  Cook over medium heat for about 7 minutes.  Be sure to stir occasionally.


3) Add in chicken stock, tomatoes, cumin, and beans.  I had forgotten to drain and crush the tomatoes but it didn't matter at all. I ended up just crushing them in the soup mixture.


4) Cut the corn in thirds.  This was really hard to do, and my muscles were not able to do it.  So in comes my live-in muscle man (a.k.a. my boyfriend).  We ended up only putting 1 of the corns in the soup and cooked the other two in the microwave separately.  Bring liquid to a boil, then simmer for about 12-15 minutes.


5)  At the very end, stir in the garlic/lime mixture.


6) Ladle into bowls and top with sliced avocado


I also served this with (boxed, easy to make) corn bread, very yummy!  My live-in food critic (also my live-in muscle man) gave this meal about an 8 out of 10.  We both really liked it, but he thought it could also use a rice mixed in.  What's great about this meal too, is we had left-overs for a few dinners and lunches!


~Eat Well and Be Happy~  

Wednesday, August 24, 2011

Turkey Burgers with Tzatziki Dressing


I recently realized that all my posts thus far are vegetarian dishes.  I didn't want to lure my faithful readers into thinking I was a vegetarian, because I'm certainly not.  I just tend to cook and eat that way.  But don't get me wrong, I love going out to a nice restaurant and ordering a steak.


I had originally found this recipe in my recipe binder (yes, I have an actual binder where the recipes are categorized and in plastic sleeves) ripped out from a magazine.  Upon examining closer, I noticed it's from Family Circle 2009.  Family Circle?? Why in the world did I buy a Family Circle in 2009?? I am certainly not their main demographic.


Alas, I now have this great recipe from them. The original recipe was for just spinach-feta chicken burgers with the Tzatziki (isn't that such a fun word to say!) dressing.  I have made them before and they were delicious.  However, for this recipe I have changed the burgers up a bit, but kept the dressing pretty much the same.
Ingredients: 
Tzatziki Dressing Ingredients


Tzatziki Dressing:
1 cucumber
5-10 plum tomatoes
1 container plain 2% greek yogurt
1/4 tsp. salt


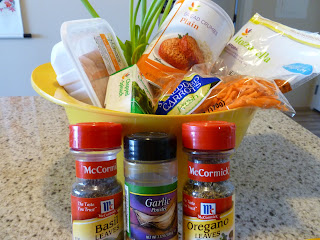
Burger Ingredients

Burgers:
1 pound ground turkey
1 package frozen chopped spinach
2-3 stems chopped scallion
1 cup (or so) shredded carrots
2/3 c. shredded mozzarella (low moisture, part skim)
1 tablespoon dried bread crumbs
Spices: Basil, Garlic, Oregano
1 egg  
4 - 100 calorie pita pockets


Tzatziki Dressing


To make the dressing:
1) Peel and thinly slice the cucumber.

2) Cut the tomatoes into fourths, and scoop out the insides (that watery/gooey/seeded part).

3) Mix the cucumbers, salt, yogurt, and tomatoes in a medium bowl.  Set to the side until ready to serve. You are probably thinking that has to be so weird to add salt to yogurt... but trust me, it's delicious!


To make the burger: 


1) Defrost the spinach in the microwave and squeeze out any excess water.


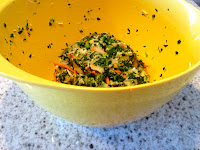
2) In a large bowl, combine: turkey, spinach, scallions, carrots, cheese, bread crumbs, egg, and spices.  When it comes to spices, I can never measure.  I don't know what it is, I always just eye-ball it.  For this I did about 2 shakes each of the basil and oregano, and about 3 shakes of the garlic powder.


3)  Using your hands, fully mix the ingredients.  Then separate into four patties.  I like to first cut it in half, then cut it in half again.  (Let's get that basic math going again... school is starting soon!)


4) Spray a large pan with cooking spray and place on medium heat.  Cook the burgers for about 12-15 minutes, flipping once.  If you have an oven therometer (and if you don't you really should have one, I live by mine!) it should read about 160 degrees in the middle of the burgers.  You can also freeze any burgers you don't use to then have another night.


5) Toast the pitas before serving, they are must better toasted!  Serve the burgers with some tzatziki dressing on top and the pitas as the buns.


BTW: I will fully admit I was rocking out to Justin Beiber (Beib's Nation as I like to call him) while I was writing this blog... what's your guilty "teenie booper" pleasure?


~Eat Well and Be Happy~

Monday, August 22, 2011

A Better Veggie Lasagna

Have you ever noticed that veggie lasagna is really just like a cream lasagna?  When you get this "veggie" lasagna at restaurants or events, it barely has any veggies in it.  While the dish may be yummy, it probably isn't the healthiest of dishes for you.  That's where this dish, A Better Veggie Lasagna, is well...Better!

There are positive and negatives to this dish, as with most dishes...

Positive:  It makes a lot and can be a great dish to serve when people come over.  I even served this dish to a "meat and potatoes" type of person and he loved it.  He even went back for 3rds!

Negative: It makes a lot... so if there are only two of you eating it (like this most recent time I made it), you will have many leftovers.  My boyfriend and I ate this for at least 3 dinners, and even a lunch or 2.

Postive: It's very customizable to suit you and your favorite veggies.

Of course the positive outweighs the negative!

  
Hints for before starting:

*Be sure to get the No Boil Lasagna noodles.  This will significantly cut your time.

*Because you are using the No Boil noodles, you will need pretty much a full jar (1 lb. 8oz.) of your favorite spaghetti sauce.  


Ingredients:

1 package frozen chopped spinach
2 cups (about) shredded carrots
2 small cans of mushrooms
2-3 stems chopped scallions
grating cheese
shredded mozzarella cheese (I like low moisture/part skim)
No Boil lasagna noodles
1 jar of favorite spaghetti sauce (I love mushrooms and always go with Ragu Super Chunky Mushrooms)
15 oz. (1 3/4 cups) part skim ricotta cheese
Spices (I went with garlic, oregano, basil)


Steps:

1) Pre-heat oven to 350 degrees.


2) Defrost chopped spinach in the microwave.  Be sure to turn a few times.  Once your muscles allow for it, break up the spinach and continue to defrost in the microwave.  After the spinach is defrosted, use a colander to squeeze out as much water as possible.  


Veggie/cheese mixture


3)  In a large bowl, combine the following: ricotta cheese, carrots, scallions, mushrooms, spinach (once fully defrosted), and spices.  It's chef's choice with the spice amount.  I usually choose to go a bit heavy on the garlic.  


3) In a large baking dish, pour a small amount of spaghetti sauce on the bottom.  Use a spoon to evenly spread the sauce.

Lasagna dish uncooked
4) Next, place 3 noodle pieces in the dish.  Be sure the noodles aren't touching each other as they will expand a bit.

5) Spread some of the veggie/cheese mixture on top (about 2/3 cup).  I like to use a spoon to make it more even.

6) Top with some spaghetti sauce and sprinkle with mozzarella cheese.

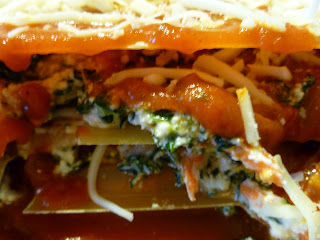
7) Repeat this layering 2 more times.

8) Then place the last 3 noodle pieces on top and cover with spaghetti sauce.  Make sure all noodles are covered with sauce, otherwise they will dry out.  Sprinkle some more mozzarella cheese and finally top with parmesan grating cheese.

Close-up of uncooked lasagna layering


9)   Cover the dish with aluminium foil and bake for 30 minutes.  Then uncover and continue to bake for 15-20 minutes.  You will know the lasagna is done when it is bubbly!

10)  It helps to let the dish sit for 5 minutes before serving it. 

Whoops...
the hot lasagna steamed up my camera lens!


Have your own version of veggie lasagna? Tell me about it in the comments section below!

~Eat Well and Be Happy~
Wednesday, August 17, 2011

Kelly Kapowski Pancakes

To my faithful Yellow Apron Experiment readers, I am terribly sorry to have kept you anxiously waiting for the next post! (Ok maybe you weren't really waiting on the edge of your seats, but I can still dream).  I have had this math curriculum project looming over my head and really had to get a jump on it.  

Now there really is no excuse as to why it isn't done yet, I have had pretty much all summer to work on it. But I'll have you know I've been very busy... gym, soccer, camping, eating, visiting with friends/family, watching Ellen, watching the Today Show, etc. 

Going back to work will certainly be a shock after this extremely relaxing summer.  Eek only 11 more days and then school starts! So I had to put aside my food passion for a bit to focus on my other passion, school and teaching...  

However, now it is on to Kelly Kapowski Pancakes.  I had found the original recipe in Self magazine, and it was what Tiffani Amber Thiessen has for breakfast.  I only ever think of her as Kelly from Saved By The Bell, hence the name for the pancakes.  I first tried the original recipe, but I didn't love it.  I thought the oats didn't really stick together.  So I decided to tweek the recipe a bit.  Lately, this is all I've been having for breakfast. 

Sidenote:  I went really crazy this morning and made the pancakes with blueberries and raspberries (not shown)... WOW!


Ingredients:
3/4 cups of rolled oats (could even do slightly less)
2 egg whites
1/2 cup frozen blueberries
1/2 tsp. cinnamon
Applesauce for on the side


Steps:

1)  Mix the first 4 ingredients together

2) Spray a small pan with Pam and place on medium heat.

3)  Evenly spread the oat mixture in the pan and cook for 5-7 minutes a side.

While waiting for the pancakes to cook, sip your favorite coffee.
I prefer Dunkin' Decaf with Vanilla Soymilk...


4) Flip once (be careful of stray oats!) and cook on the other side for another 5-7 minutes


5)  Serve with applesauce.  I'm a "dipper" so I like the applesauce on the side.  But to each eaters own!  


Have a favorite Saved By the Bell episode?? Did you try your own version of the Kelly Kapowski Pancakes?  Tell me about it in the comments section below!


~Eat Well and Be Happy~

Thursday, August 11, 2011

Quinoa, Tomatoes, Olives, Feta... And All in One Dish


This quinoa dish is delicious and super easy to create.  It can be served as a side to a dinner, or really it can be a  meal in itself.  Quinoa is a "complete protein" (check out the link for full details) which basically means it's really good for you.  Quinoa is high in protein, calcium, iron, fiber, and  magnesium.  For all you vegetarians out there (and non-vegetarians too), if quinoa isn't already part of your regular diet, it is a must!!


Ingredients:

2 c. Chicken Broth
1 c. Red Quinoa 
(really any type would work, but the red gives it a nice color)
35 Grape Tomatoes, cut in half
1 can sliced Olives
3/4 c. Feta Cheese


Steps:

1) In a pot, bring quinoa and chicken broth to a boil.


2) Let simmer for about 10 minutes, then add in halved tomatoes.


3) Continue to let simmer until all the liquid is gone.


4) Mix in the feta and olives.


5) Serve in a large dish!


Be sure to finish the meal with your favorite dark chocolate... for health purposes of course!


Give this meal a try and let me know how it goes! Put your own twist on it?  I'd love to hear it all below in the comments section!


~Eat Well and Be Happy~

Friday, August 5, 2011

Sake To Me Tofu

This recipe was a new one, and it was pretty successful.  I had never cooked with sake before and wanted to give it a try.  The inspiration for it came from the previous night when I went to dinner at Mount Fuji in Oneonta, NY with my parents and my Grandpy.

Afterwards we went to an amazing Cherish The Ladies concert at The West Kortright Center.  The Center is an 1850's church converted to an arts center in the middle of a beautiful valley of the Catskills.  If you haven't ever heard of Cherish The Ladies or haven't been to the center, it's an absolute MUST!  However, I digress... Onto the meal!


Ingredients:
Nasoya Lite-Firm Tofu
3/4 cup Sake 
3 tablespoons Soy Sauce
1 Scallion (3-4 stems)
1 1/2 tablespoons Fresh Grated Ginger

*Note to the reader: this is not a procrastinators meal.  It needs about 4 hours to marinate*


**Another side note:  I didn't use olive oil with the meal, but I think it would be good to add to the marinade! **


Steps:
1)  Slice the tofu into about 1/4 to 1/2 inch thick pieces.  Use tea towels to squeeze out as much water as possible.  Leave to the side while you make the marinade.


2)  In a shallow dish pour about 3/4 cup of sake.  The local liquor store man said that when cooking with sake, the cheapest one is fine.

Fun Fact: The liquor store man also said that cheap sake should be drank cold, expensive sake should be drank warm!


3)  Add in chopped scallions, grated ginger, and soy sauce.
Grated ginger


I was an idiot and forgot to buy soy sauce at the grocery store... thank goodness you get so many packets when ordering Chinese take-out! 


4)  Lay the tofu in the pan to marinate for about 4 hours.  Be sure to flip every hour.


5)  Since I was at my parents house, where a grill was available I wanted to try these on the grill.  Living in a small city apartment, where there isn't a grill, I like to use one whenever I can.

Well I don't actually do the grilling, I supervise my Pops while he does it!  Grills always scare me a bit...


Of course you must have your favorite wine handy while waiting for the tofu to grill


The tofu took about 5-7 minutes a side.  Once you flip the tofu on the grill, add some of the left-over marinade to the top.


Serve outside in a beautiful country setting!!


Have you ever cooked with sake?  Or maybe just have fun stories to share of shenanigans with sake?  Tell me all about it in the comments section below!


~Eat Well and Be Happy~


Thursday, August 4, 2011

Crammed to the Brim Tacos... A Kid-Friendly Meal Part 2

It was a rainy day, and we were running out of activities to do with my niece and nephew (age 3 and 5 respectively).  You can only spend so many hours building with Legos or playing with a baby doll.  So we got everyone (everyone being: the two kids, Vovo and Grandpy Joe, the two dogs, and myself) together to create Crammed to the Brim Tacos for a Kid-Friendly Meal, Part 2.

Again, this isn't a super gourmet meal.  However, kids love to be involved in preparing the foods.  And note to adults: After the grocery shopping, preparing, eating, and discussing it's a time-consuming activity on a rainy afternoon!

Ingredients:

 (It's important to have lots of ingredients, so everyone is able to participate, including lots of veggies!)


  • Taco Shells
  • 1 pound of Ground Turkey (97% FF)
  • Salsa
  • Hot Sauce (strangely enough my 5 year old nephew LOVES hot sauce!)
  • 1 can of Black Beans
  • Sliced Olives
  • Spinach
  • Shredded Lettuce
  • Carrots
  • Shredded Cheese
  • Fresh Parmesan Cheese


Steps:
1) As with the Part 1 meal, have all ingredients prepared before you call the kids to help!  I used separate bowls to hold each ingredient.

Hands washed, chairs in place, ready to go!


2)  Empty each of the ingredients (except the turkey and shells) into separate bowls.  Remember to make it equal for each kid!


Now the dogs are a vital part to creating this meal.  When you cook with kids, one must realize that it is very common for the food to miss the bowl and fall on the floor.  This is where the dogs come into play, and they love it.  As shown here, one of the dogs was after the fallen carrots!

We love cheese!
The Beans


Wow that's a big handful of spinach!
More Cheese...

3)  Meanwhile cook the ground turkey on medium heat (obviously this is an adult step).  Add in a packet of taco seasoning and a can of mushrooms.  Cook through.


4)  Line the taco shells on a pan and back at 350 degrees for about 7 minutes.


Blue Steel in-training??


5)  Neatly place the bowls on the table.  Create the tacos crammed to the brim to your own desires!

Lots of black beans...

Picking at the cheese while waiting...


Yum!!


Phew, I'm pooped from all that hard work!


Sidenote:  The reason this took 3 adults to make: Vovo was cooking the meat, I was helping with the kids part, Grandpy Joe was taking the pictures...


~Eat Well and Be Happy~